Have you ever encountered the problem of Windows deleting files automatically? If you are confused about why this issue occurs and how to recover deleted files, this is the right place. This post gives you a detailed explanation and a full data recovery guide with powerful data recovery software.
In the daily use of Windows computers, we may encounter a confusing problem: files are automatically deleted without us actively deleting them. The problem of Windows deleting files automatically may lead to the loss of important data, affect work and study, and even cause irreparable losses.
Why Windows 10 keeps deleting my files? What is the purpose of this process? I have now restored at least 5 times, and it is all becoming very frustrating. Who do we advise at Microsoft to get them to stop? Every time I shut down my computer, the issue begins again. Does anyone have the contact details, please?answers.microsoft.com
What causes Windows deleting files automatically? How to solve this problem and prevent important files from disappearing? This article will delve into the possible reasons and provide effective solutions to help you ensure data security.
How to Recover Windows Deleted Files
This section includes a detailed file recovery solution, allowing you to easily retrieve lost files.
Way 1: Via File History
If Storage Sense or other cleanup tools automatically delete some files, File History can help you get them back. But you need to note that File History needs to be enabled and configured in advance, and there must be an external or network drive to store the backup. If it wasn’t turned on, you may need to try other methods, such as retrieving files from the Recycle Bin or Windows backup. If you set it up in advance, follow the steps below to recover the files.
Step 1: Open Control Panel, change the View to Large icons, and choose File History.
Step 2: In the left pane, click Restore personal files.
Step 3: Find and select the files you want to restore and click the green button.
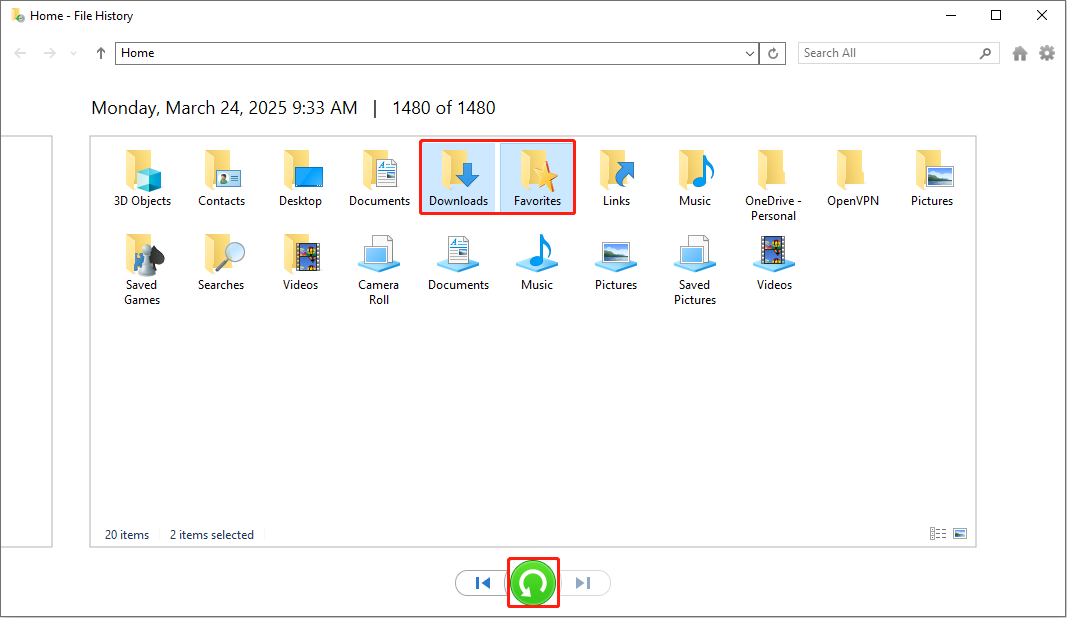
Once you have completed these operations, go to the original location to check if the file has been restored successfully.

Way 2: Via MiniTool Power Data Recovery
If the above way doesn’t work for you, data recovery software is a very good choice. There are many recovery tools on the market. Which one is more reliable? Here, I recommend MiniTool Power Data Recovery to you.
This robust tool can find and recover a variety of file types, including photos, videos, audio, documents, etc. This data restore tool is a suitable option for recovering files deleted automatically by Windows.
Additionally, this software supports data recovery from various storage media, including internal hard drives, external storage devices, USB drives, SSDs, and CDs/DVDs. It can also recover formatted USB drives and inaccessible partitions. This free file recovery software allows for the recovery of up to 1GB of data.
Step 1: Download and install MiniTool Power Data Recovery on your computer to get started.
MiniTool Power Data Recovery FreeClick to Download100%Clean & Safe
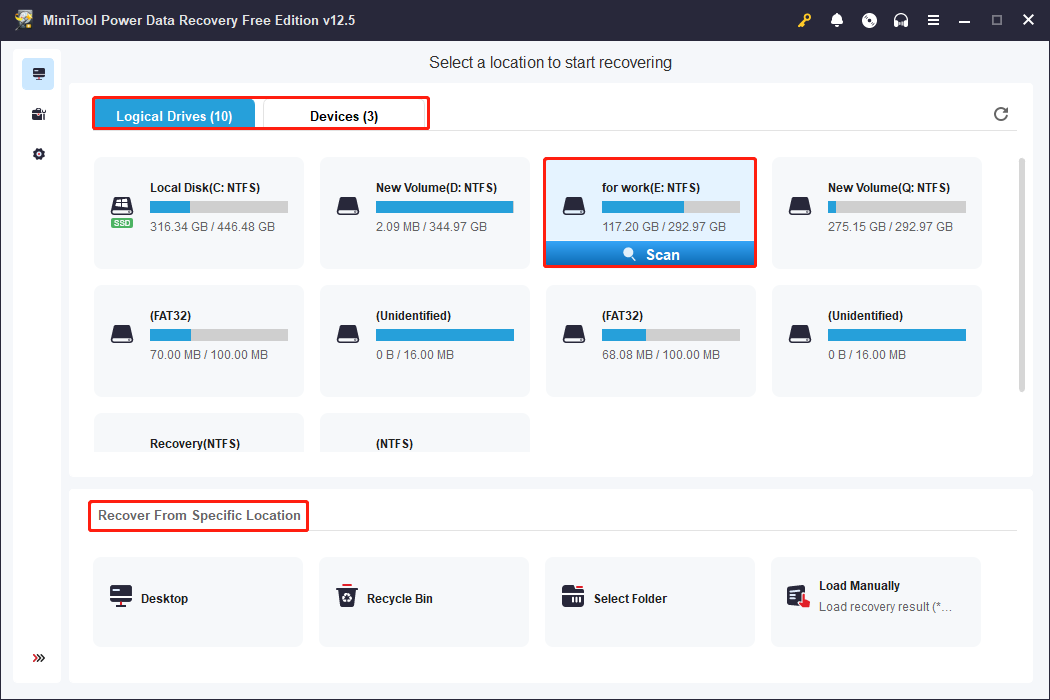
Step 2: After the installation is over, launch this software. When you enter the main interface, the Logical Drives section lists all the partitions on your computer hard disk, including lost partitions and unallocated space. The Devices section shows all the disks. At the bottom, it allows you to select a specific location to restore the file, such as the Desktop, the Recycle Bin, or a folder.
Find the location where your deleted files are stored, move your cursor on it, and click Scan to scan for data.
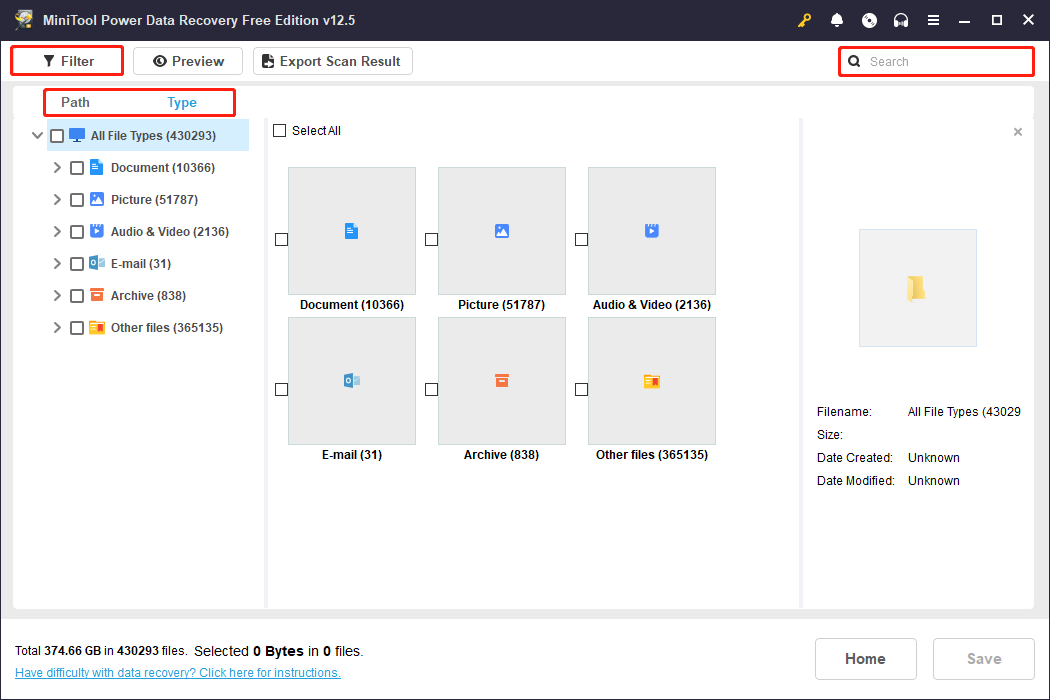
Step 3: Scanning data will take some time. To get better scanning results, you need to wait patiently until this process is completed. When it ends, files can be found according to their file structures under the Path tab. It may take some time to find the file using this method. Don’t worry, there are several features that can help you find the files you want quickly.
- Type: Switch to the Type tab, and you can narrow the scope according to the file type, such as documents, pictures, videos, and audio, to find the corresponding files.
- Filter: You can filter the files you want based on file type, file size, file modified date, and file category. It is fastest to set the filter conditions at one time.
- Search: Type the full or partial file name in the search box and press Enter to filter out all unnecessary results.
Step 4: After finding all the target files, you can preview them to make sure they are the correct ones. Select the file and click the Preview button, or just double-click the file you want to check.

Step 5: After confirming the file, you can proceed to the last step. Tick all the files you want to recover and click the Save button. There will be a window prompting you to choose a location. It is best to choose a new path to prevent deleted files from being overwritten. After selecting the directory, click OK to start the recovery process.
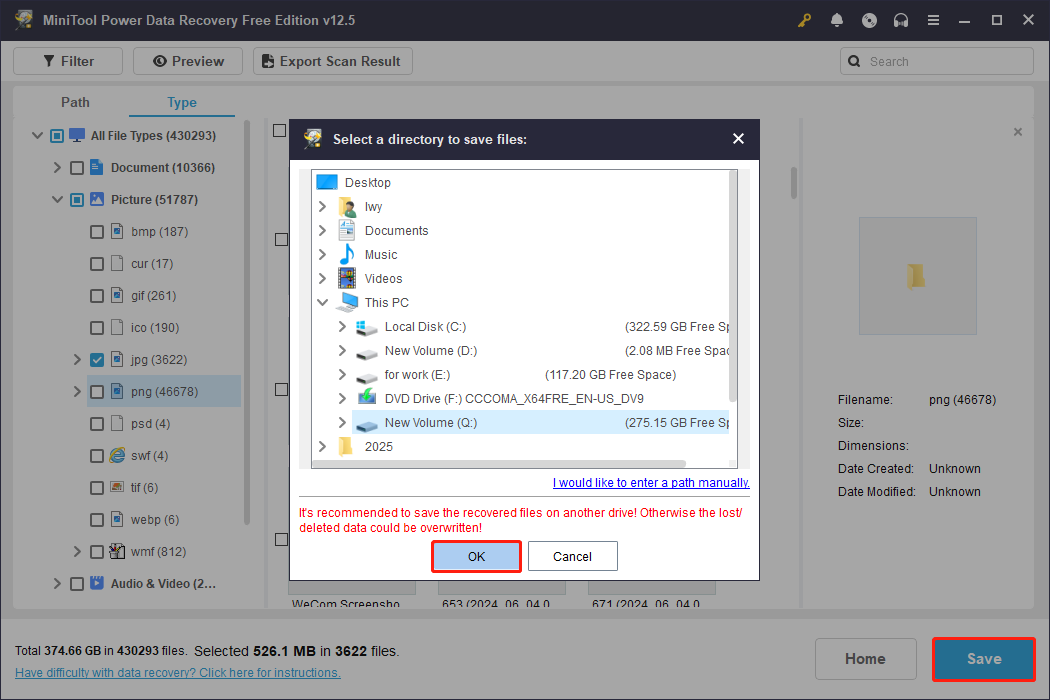
When the Recovery Completed window shows up, navigate to the selected location and check if the files are here.

Why Does Windows Delete Files Automatically
After recovering the lost files, I will explain to you why Windows automatically deletes files, so that you can have a more comprehensive understanding of the problem. When Windows automatically deletes files, it is usually not a system error, but rather some functions or software perform cleaning operations according to specific rules. The following are some common situations.
- Storage Sense: Windows has a Storage Sense feature that automatically cleans up temporary files, files in the Recycle Bin, and old files in the Downloads folder to free up disk space. If this feature is enabled, some files may be deleted.
- Windows Defender false positives: Windows Defender may mistakenly identify some files as malware and automatically delete them. You can add exclusions in Windows Defender settings to prevent important files from being accidentally deleted.
- Faulty updates: Some Windows updates may cause files to be lost or deleted. If this problem occurs after you recently installed an update, you can try uninstalling that update.
- Malware or viruses: If your system is infected with a virus or malware, it may automatically delete or corrupt files. It is recommended to run a full virus scan to ensure the safety of your system.
- Hardware or driver issues: A faulty mouse, keyboard, or storage device may cause files to be accidentally deleted. For example, the Delete key on the keyboard is stuck, or the mouse clicks abnormally.
- Temporary user account or Guest mode: If you use the system in guest mode or some temporary user account, Windows will automatically “delete” all local data under that user when you log out of the account.
- Low disk space: When the system is extremely low on space, Windows might sometimes actively try to free up space, including forcibly deleting certain cache or temporary data files.
- Desktop virtualization or cloud synchronization issues: When using cloud services such as OneDrive, if local synchronization fails or files are marked as “available online”, these files may “disappear” or be cleared by the system cache when the network is disconnected.
How to Stop Windows From Deleting Files Automatically
Now that you should understand the potential causes of automatic file deletion and have reviewed some basic precautions, let’s move on to the specific steps you can take to configure Windows settings and prevent unwanted data loss in the future.
Way 1: Turn off Storage Sense
Storage Sense will regularly clean up temporary files and the Recycle Bin contents. If you don’t want the system to automatically delete certain data, you can choose to turn it off and manage the files manually.
Step 1: Right-click the Start button and choose Settings.
Step 2: Click System > Storage to enter the interface.
Step 3: Under Storage, switch the button to Off.
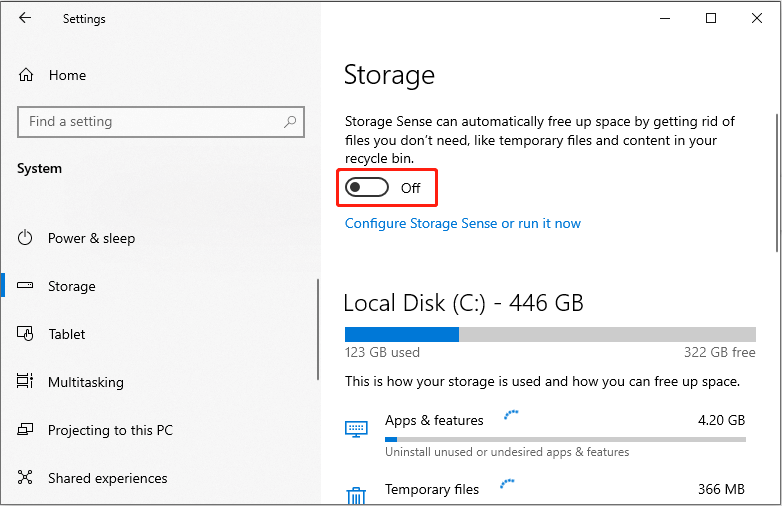
You can also customize Storage Sense settings by clicking the Configure Storage Sense or run it now option.

Way 2: Add Files to Windows Defender
Some files may be mistakenly recognized as viruses or malware by Windows Defender, causing them to be automatically deleted, especially files that it considers to be security risks. To prevent this, you can add files to Windows Defender exclusions so that Defender does not scan or delete those files. Here is how to do it.
Step 1: Press the Win + I keys to open the Settings app.
Step 2: Click Update & Security > Windows Security.
Step 3: Under Protection areas, choose Virus and threat protection.
Step 4: Under Virus and threat protection settings, click Manage settings.
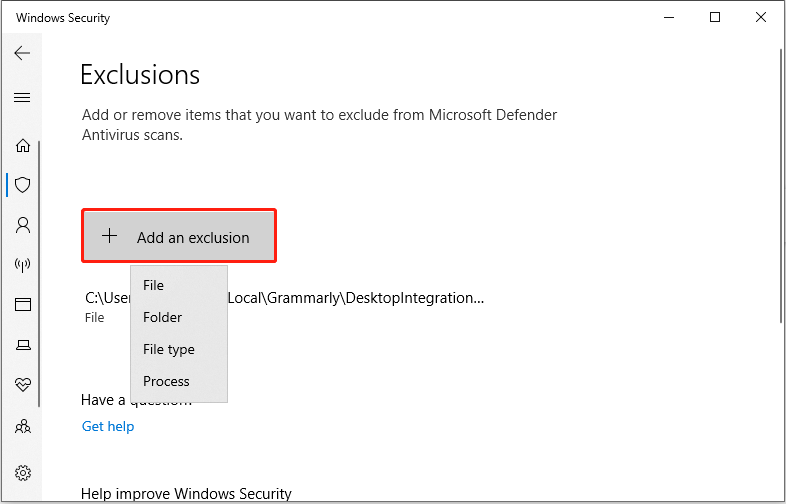
Step 5: In the Exclusions section, click Add or remove exclusions.
Step 6: When prompted by the UAC window, click Yes to continue.
Step 7: Click Add an exclusion, choose a type, and then add the specific file or folder you want to exclude.
Way 3: Check for Recent Windows Updates
Although Windows updates are usually for improved security and functionality, they can sometimes contain unexpected bugs. Some Windows updates may conflict with existing software or settings, causing file management anomalies. If the new version causes files to be automatically deleted, uninstalling the update may be a temporary solution that can help you return to the last working version and avoid further losses. Here are the steps.
Step 1: Open Control Panel and choose Programs and Features.
Step 2: In the left pane, click View installed updates.
Step 3: Uninstall any recent updates, reboot the system, and check if the issue is fixed.

Way 4: Scan for Viruses
Automatic file deletion by Windows can sometimes be related to viruses or malware, so virus scanning is an important step in troubleshooting. And if your computer has been losing files frequently recently and has other abnormal behaviors, such as pop-up ads, slow operation, etc., it is even more recommended to scan for viruses immediately. The operations are as follows.
Step 1: Open Settings and click Update & Security > Windows Security.
Step 2: Under Protection areas, click Virus & threat protection.
Step 3: Under Current threats, click Scan options.
Step 4: Choose a scan option based on your needs and click Scan now.
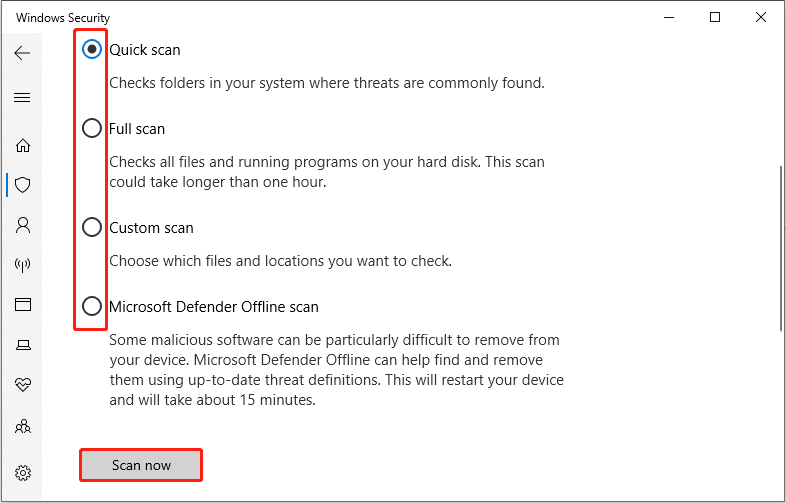
This scan process may take some time. You need to wait patiently for it to complete.
That’s all about how to fix files automatically deleting.

Wrapping Things Up
Now, you know how to stop Windows 10 deleting files automatically, such as troubleshooting system settings, checking storage space, etc. Regularly backing up files, keeping the system updated, and developing good computer usage habits will greatly reduce the risk of data loss.
When you need to recover deleted files, try MiniTool Power Data Recovery. I hope the solutions provided in this article can help you better manage and protect computer files and make your Windows system more stable and reliable.
Any suggestions about MiniTool products are welcome. Feel free to contact us via [email protected].
About The Author

Position: Columnist
Chelsea graduated from university with a major in English. She has a strong interest in English writing. It is this passion for writing that led her to become an English editor. Her articles mainly foucus on data recovery and other computer industry news. As an energetic and outgoing girl, Chelsea enjoys listening to music, singing, riding bikes, and eating in her spare time.
User Comments :